
| Creator | Phax709 |
|---|---|
| Category | Builds |
| Size | 25 × 14 × 78 blocks |
| Blocks | 8,269 |
| Minecraft | 1.21.X |
| Create | 6.0.10 |
| Mods | Create, Copycats, Create train parts, Createdeco, Diagonalfences |
| Downloads | 153 |
| Added | 2026-08-13 |
Schematic by Phax709, published on CreateMod.com. This page lists what it contains; download the file from the creator’s page.
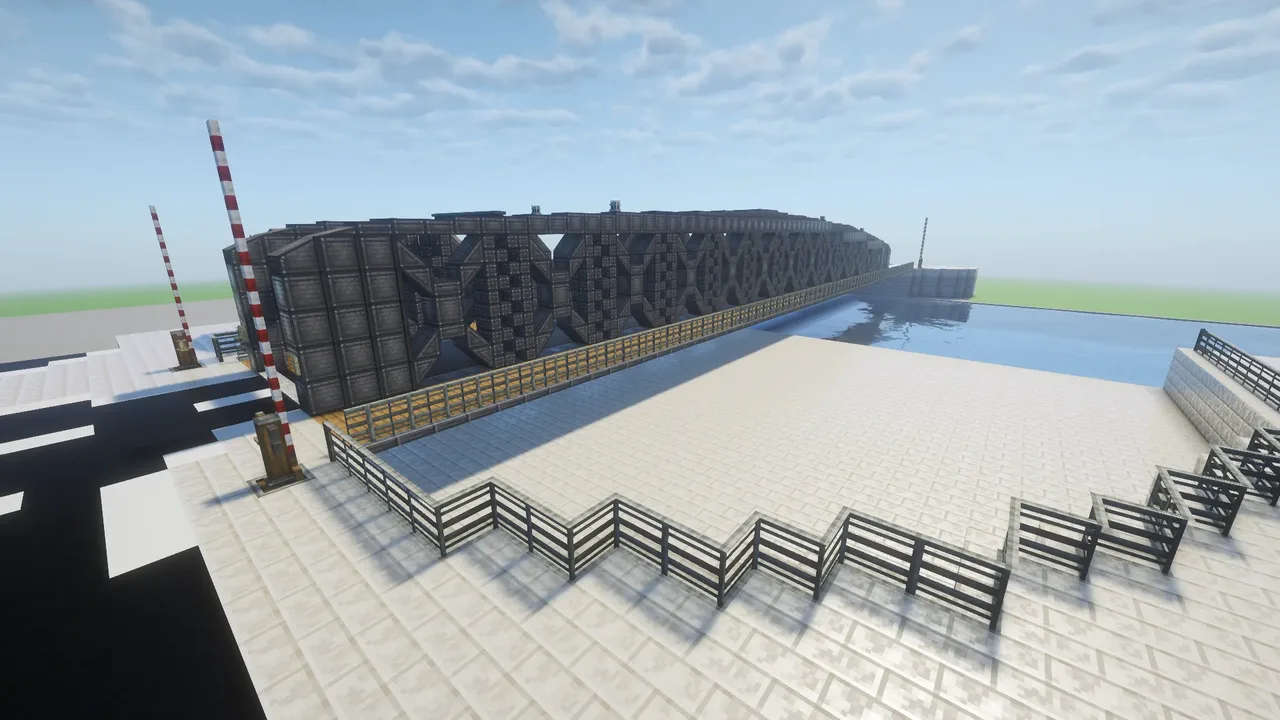
Pont Colbert (Dieppe, France) - Create Mod Schematic [V2 Update]
A functional 1:1 scale replica of the iconic Pont Colbert from Dieppe (France), fully automated using the Create mod! It features realistic road safety sequence barriers and a 90° rotating bridge mechanism.
IMPORTANT: Post-Placement Setup & Known Issues
Due to Create mod orientation mechanics, please check these points right after pasting the schematic:
Mechanical Bearing Setting: Set the Mechanical Bearing to "Only place when anchor destroyed".
Why? This keeps the ~4,000-block bridge as a permanent Contraption entity, preventing mass-conversion server lag and avoiding Super Glue loss.
Schematicannon Settings:
It is recommended to use "Replace solid with empty" to cleanly clear the water and canal area.
Note: With this option, the Schematicannon will remove any obstructing blocks within the schematic's bounding box (e.g., clearing dirt blocks where the schematic expects air).
Enable Protect tile entities.
Missing Water Wheel: Depending on placement or Schematicannon quirks (especially if facing North or West), the Large Water Wheel might not spawn. If missing, go down below the control room, head through the spruce door into the wheel room, and place the Large Water Wheel manually.
Sequenced Gearshift Inversion (North/West placement): If placed facing North or West, you MUST reverse the rotation direction on the Sequenced Gearshift! Otherwise, the bridge will rotate towards the control cabin instead of away from it.
Barrier Levers Adjustment: Check the safety barriers. If one side stays open, flip the lever located directly underneath that barrier mechanism to invert the signal.
Piston, Boiler & Campfire Update: Regardless of orientation, break and replace the piston, the boiler block, and the campfire once to update their states properly.
DISCLAIMERS & WARNINGS
Player Death Bug: During testing, dying near the structure caused the Super Glue and the road barrier structures to vanish (except for the main pivot post). Keep a backup or re-apply glue if this happens!
Water Supply Setup: The system features a pipe leading into the canal by default to pump water for the mechanism. You can freely extend or adjust this pipe to pump water deeper or adapt it to your specific needs.
Quay & Environment: The schematic includes parts of the surrounding quay/docks. Feel free to modify or replace these quay sections to fit your custom terrain and build environment.
How to Use
INITIAL AUTO-MODE SETUP
Please read these steps carefully before triggering Auto mode for the first time, as they describe the necessary first-time launch procedure:
Lever Check: If you haven't already done so during the Post-Placement Setup, check the safety barriers. If one side opened incorrectly upon placing, flip the lever located directly underneath that barrier. (If you already completed this step, move to step 2).
Go inside the control room and press both manual barrier buttons once (both the entry and exit barrier buttons).
Once these steps are complete, your bridge is fully initialized and ready to use in Auto mode!
Automatic Mode (Single-Button / Realtime Timings):
Press the [AUTO] button once to launch the sequence:
Closing the Road (Opening Canal for Ships):
0s: Entry road barriers start closing immediately.
20s: Evacuation delay ends, exit barriers trigger to close.
21s: Safety timer ends (13s barrier motion + security margin). The bridge rotates 90° to free the canal.
Opening the Road (Closing Canal for Ships):
Bridge rotates 90° back to the road position (21s).
Once fully aligned, all 4 safety barriers open simultaneously.
WARNING: Do not press the button while an automatic sequence is currently running!
Manual Mode (Full Control & Roleplay):
Use the dedicated manual buttons in the control cabin if Auto mode glitches, to reset the mechanism, or simply if you prefer to operate the bridge yourself for a realistic roleplay experience:
Entry Barriers Button: Controls the entry safety gates.
Exit Barriers Button: Controls the exit safety gates.
Manual Bridge: Rotates the bridge directly.
ROLEPLAY SAFETY PROTOCOL: Always lower entry barriers first, wait for vehicles to clear, lower exit barriers, and only then rotate the bridge manually!
Need Help?
If you encounter any issues during setup or operation, feel free to leave a comment below and I will do my best to help you out!
and 4 more block types
 Industrial Power Plant with Two Modern Houses35,138 blocks · Nassimgaming
 Medium cruiser "Popcorn"1,206 blocks · Popcorn
 Saurons Tower -bubbellboy1,565,496 blocks · Bubbellboy
 V-4NT0 starter base2,907 blocks · V-4Nt0
 Mini Store2,062 blocks · Jackjackxx2
 Your Japan Building that you can live for the entire day with create items5,376 blocks · Jeremy2408
 Optimus Prime( The truck) Peterbilt 379315 blocks · Im_a_potato__
 Workshop + haves superheating296 blocks · Atomic_cherri
 Profesional build723 blocks · Honzaan
 junkyard parkour arena1,401 blocks · Ticoo
 bumper cart43 blocks · Neonprox
 Factory (furnished)4,417 blocks · Ordinarv