
| Creator | Spidermnke |
|---|---|
| Category | Tanks & Military |
| Size | 15 × 4 × 20 blocks |
| Blocks | 178 |
| Minecraft | 1.21.X |
| Create | 6.0.10 |
| Mods | Simulated, Create, Createbigcannons |
| Downloads | 215 |
| Added | 2026-08-28 |
Schematic by Spidermnke, published on CreateMod.com. This page lists what it contains; download the file from the creator’s page.
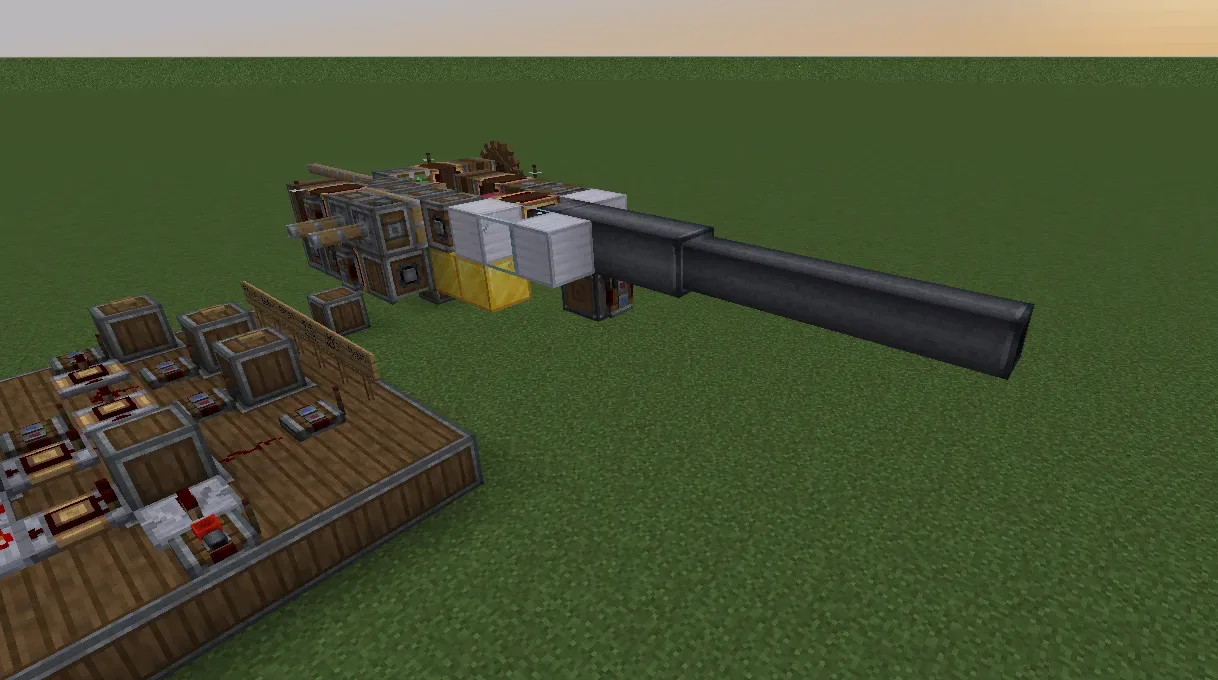
This Autoloader is meant to be your go to for modern tanks/warships/airships/vehicles in create simulated. It is also made with survival in mind, not that it is cheap or easy to get working any just any vehicle, read along for a thorough explanation. If it isn't instantly clear, the idea is that you aim the autoloader and cannon in it's entirety using create simulated. Use honey on the entire cannon and following the operation guide after that. I might make an example tank to illustrate this and or a survival build guide further down the line if demand forms.
STATS
Reload time is 4 seconds, with a few ticks overkill included to ensure it never fails due to a minor lag spike or create simulated oversight in physics. The design is only 2 blocks Tall but don't forget the protrusions along the width and the needed gap for the ram-head-shuffle and payload itself. It features a necessary engine for the screw (32 RPM), the main power drive can be any power source but in the schematic another engine is used, run the system at 128 RPM, The main system never uses more than 2048 SU.
The signs reiterate the sequenced gearshift instruction if the cannon needs to be partially reconstructed in survival, if these are empty for you after printing make sure you're not using create tracks+, this disables data transfer of signs and the necessary sequenced gearshifts. The instruction are repeated in one of the images in case you need this mod for your play-trough, or it is bugged otherwise.
THE CANNON IN 3 PARTS: EXPLAINED (for usage see operation guide below)
The Screwdriver is the key to unlocking auto loading, everything else happens when the lid is open, it is the last and first step and therefore the most important one. The double mechanical bearing turn off collision for the screw and it's screwdriver during the placing and loading of the payload, make sure they only place near initial angle. When anything goes wrong, this part will be broken no matter what, and it is usually the cause itself.
The Placers are the 2 separate duos of deployers pushed by pistons, these have be sequenced to prevent payload collision with the pistons, it is normal that the ram-head gets pushed to the side by the second set, this means there has to be and empty spot next to it at all times, there is no extra storage implemented because 64 shots should be plenty, changing munition is manual. testing the first set of deployers is only possible when the deployers are EMPTY and the screwdriver is absent/collision-less, else you'll shove the screwdriver over. just like the screwdriver make sure they only place near initial angle. make sure the 2 blocks ahead of the deployers are filled just like in the schematic (iron block and the glass in schematic).
The Ram is the simplest but most time- and space-consuming part, it can only be fired safely when the screwdriver isn't in the way, otherwise your screwdriver and cannon get shoved along.
OPERATION GUIDE
0 Don't rotate or mirror the schematic as this isn't tested, just build it facing south and attach it to whatever creation you like, then using create simulated you can rotate it as you see fit, the gold and iron blocks are merely colourful and not necessary but indicate how to connect the cannon with the least amount of blocks
1 Ensure the sequenced gearshifts have instructions
2 Check glue, both deployer sets have to be separate, and the screwdriver should be an L shape
3 Fuel the engine and supply the main sequence with power (with the built in engine or otherwise)
4 Ensure all pistons/bearings (except the ram-head) are set to place only in starting position, and that the cannon itself has other supporting blocks
5 Test the screwdriver (sideways oak button) and both placers (oak buttons near cannon) SEPARATELY reminder that the screwdriver engine needs to temporarily be removed
6 Test-load (stone button in the middle), the screwdriver should lose collision, the deployers fire sequentially, and the ram escapes just in time for the screw to resettle. DO NOT PRESS AGAIN WHILST LOADING, this is not dumb-proofed.
7 Test-fire (without charge still), the circuitry prevents you from firing before the loading is done, you should see the cannon quickly form up WITH the screw attached, attempt to fire and resettle, confirm this is the case
8 If all the steps up to now have broken nothing, fill up the back 3 deployers with powder charge and the front one with your desired munition type
9 Load using middle stone button the note block will notify you when payload is ready
10 Fire after the ding using the stone button next to the note block
11 Repeat !!! ONLY RELOAD AGAIN AFTER THE CANNON HAS FIRED !!!
MOUNTING THE CANNON
Just honey glue the entire thing, the gold blocks are not needed but highlight the important connection, otherwise your cannon barrel will stick to the screwdriver. Don't forget that as a simulated physics object, you'll need to use a schematic for the deployers to maintain placement regardless of orientation
IT BROKE WHAT DID I DO WRONG
These are mistakes I have made a lot whilst designing this thing, there's no need to repeat them.
-I didn't follow the operation guide correctly
-I mirrored/rotated the schematic before placement
-I used a different RPM/inconsistent RPM/I didn't maintain 2048 SU's
-I forgot to refuel the screwdriver after rebuilding the engine
-The screwdriver/placer isn't glued correctly after rebuilding
-I forgot to replace some iron/gold blocks and glue them correctly
-I loaded the cannon twice before shooting
-I loaded directly after/during firing
-I unloaded the cannon by leaving render distance whilst it is loading
-YOU are using a different version of create or minecraft
 Dual Aimable Autoloading Cannons100 blocks · Timdatiny
 Tank (mouse controlled!) pls read description162 blocks · Jarg
 IRON NEST14,076 blocks · 0407300890
 One Use tie bomber544 blocks · Ozzytheweirdman
 Cool Tank171 blocks · Mirci
 Fast hover tank241 blocks · Thefoxin51
 HOW TO MAKE THIS ROTATE?142 blocks · 4Motynoe
 c-ram11 blocks · Magisme
 JE-MBT-01319 blocks · Rgthrthgr_51087
 Crawler MK-2218 blocks · Harutoavid
 Gear-Gator Amphibious Tank156 blocks · Kyczcho14
 Panther G1,190 blocks · Editsdojohnny2