
| Creator | Careraaa |
|---|---|
| Category | Builds |
| Size | 11 × 15 × 71 blocks |
| Blocks | 2,160 |
| Minecraft | 1.21.X |
| Create | 6.0.10 |
| Mods | Create submarine, Create, Createdeco, Createaddition, Createbigcannons, Vista, Createdieselgenerators, Create connected, Quark, Create radar, Drivebywire, Copycats, Farmersdelight, Dndesires, Aeroworks, Simulated, Createendertransmission |
| Downloads | 537 |
| Added | 2026-07-15 |
Schematic by Careraaa, published on CreateMod.com. This page lists what it contains; download the file from the creator’s page.
This is my first schematic upload. (Updated)
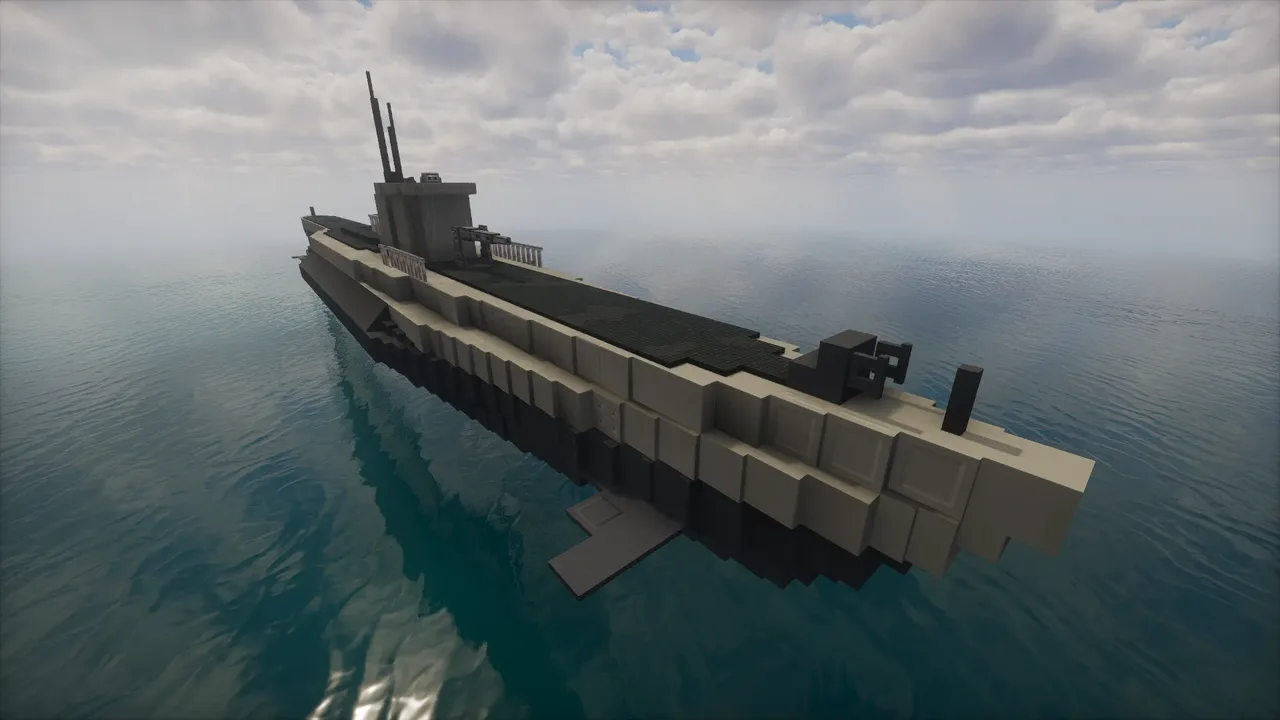
This is a Type VII U-Boat built for Create: Deep Seas. It isn't a perfect recreation of the real submarine, especially the engine layout, but my goal was to make it fully functional. It features automatic depth control to stop the submarine from constantly sinking or rising, which helps work around some of the current quirks in Create: Deep Seas. It also has Engine Mode, Battery Mode, and a working Vista periscope.
The submarine has been updated since its first release. The propellers have been moved farther back to improve stability and reduce tilting. I also found a way to increase the submarine's speed: in the Create: Deep Seas config, change the Submarine Propeller Speed value from 3 to 10. This makes the submarine much faster while still remaining controllable.
I didn't include torpedoes because I haven't found a good mod that adds them, and I'm worried an assembled torpedo contraption could collide with the submarine and break it. If you have a better solution, feel free to add your own.
Setup
First, connect the 6 Drive by Wires connections at the tail.
The Acacia Signs are -Y. Connect them, then remove the signs.
The Birch Signs underneath the propeller are +Y. Connect them, then remove the signs afterward.
At the Cherry Sign above the tail, the exposed gearshift is -X. Remove the chain drive underneath to reach the other side of the gearshift, connect +X, then place the chain drive back.
Next, connect the lever with the red wool to the deck gun using Drive by Wires.
Finally, connect the Tweaked Controller to the Tweaked Controller Hub.
Since schematics don't save wire connections, reconnect the electrical system. Connect the two motors at the back to the Redstone Relay (Pull). Connect the motor brush at the back of the engine (Push) to the Battery (Pull). Connect the Battery (Pull) to the Redstone Relay (Push). Finally, connect the Electrolyzer directly to the Battery (Pull) and make sure the Electrolyzer is turned on.
Controls
I've marked the control levers with temporary blocks that you can remove later.
Glowstone = Engine Mode
Magma Block = Battery Mode
Copper Block = Dive/Surface (Lever Up = Surface, Lever Down = Dive)
Important: Never turn on Engine Mode and Battery Mode at the same time, as this can break the engine. Turning on Battery Mode will automatically stop the diesel engine.
Starting the Engine
Before starting the engine, fill the fuel tank with Diesel or Biodiesel.
Make sure Engine Mode and Battery Mode are both OFF.
Crouch while turning the crank behind the fuel tank until the engine starts. Once it's running, flip the lever at the very back of the engine (not the wall controls). The submarine is now ready to sail.
Diving & Surfacing
To Dive
Turn OFF Engine Mode.
Turn ON Battery Mode.
Flip the Dive/Surface lever to Dive.
To Surface
Flip the Dive/Surface lever to Surface.
Turn OFF Battery Mode.
Turn ON Engine Mode.
Automatic Depth Control
The automatic depth system is controlled by the Altitude Sensors at the front of the submarine.
The left Altitude Sensors control how deep the submarine stays. The Green Lamp is set to Periscope Depth, while the Blue Lamp is left for you to configure.
The right Altitude Sensors stop the submarine from getting too close to the surface. If it starts floating up too high, they'll automatically push it back down.
Do not go below depth 36, or the submarine will implode.
Final Notes
After placing the schematic, reconnect the Radar, Display Links, and Data Links, as those connections aren't saved with the schematic.
I added iron blocks to the 3-block gap at the back to help balance the submarine underwater. If, after assembling, the submarine tilts too much, remove the iron blocks and restart the world to reset the assembled weight. You can then add the iron blocks back if needed.
Credit to Lord_van_cat for the block palette, texturing inspiration, and engine design that I referenced while building this submarine. Be sure to check out his work as well.
Feel free to improve the submarine or leave any suggestions. Since this is my first schematic upload, I'd really appreciate any feedback.
and 35 more block types
 Oil refinery58,349 blocks · Builderguy
 Medium Workshop / Warehouse 17x111,208 blocks · Itzvgc
 Large Hangar by abceyd14,893 blocks · Abceyd
 Old Brick Factory #25,902 blocks · Icyfresh
 fantasy steampunk factory5,889 blocks · Vaslic
 Beautiful, smart storage system (warehouse)4,492 blocks · Soundsgreat
 Cactus Farm9,751 blocks · Greboчek
 casteloLacthur
 medieval house3,780 blocks · Hnelon
 Giant Clean Tree198,108 blocks · Fuzzyzockt
 Villager Trading Hall13,094 blocks · Timasius
 Old Brick Factory8,754 blocks · Icyfresh